How to shrink partition with freeware to make unallocated space
Do you have some large partition which has too much free space for example: 100GB of partition d: but just with 20GB data on the partition? However there are some smalll partition to be extended since its size small. This articles is going to tell you how to shrink partition with free method (shrink large partition with freeware).
Who may benefit from this article?
- when you have one partition on a whole disk and want to shrink to make some other partitions
- when your partitions were set too big or small
- you are looking for free tips or method to rearrange your partitions
- shrink volume when shrinking cannot be performed by Windows XP, Vista...
Freeware tutorial to shrink partition without system reinstallation
With a partition software, it is safe to shrink any partition including the boot partition and keep data and system intact. Here we would like to show the steps shrinking c partition and then create a new partition.
Partition Wizard Home Edition, a free program that can be used to resize partition (mostly extend partition, shrink partition, move partition), and keep your system untouched. You don't have to reload OS to change the size of your system partition. Here we made an example to shrink C drive when c is with too much space (some users only have one partition c: of its whole disk even when it is 500GB, 1TB etc.), and then you can redistribute the free space produced from C for any further use, eg: create another new partition or more partitions for better disk and data arranagement.
- Download a free copy of Partition Wizard Home (freeware)
- Run its .exe file to start installation of this freeware
- Click its icon on the desktop to run the program

- And you will see a main screen of this program and the disk 1 is just with c:.
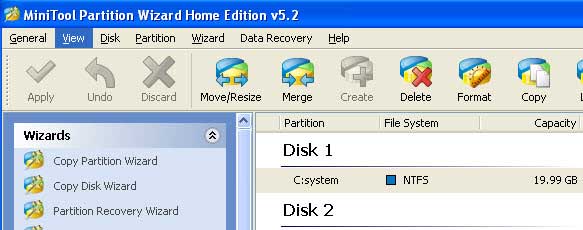
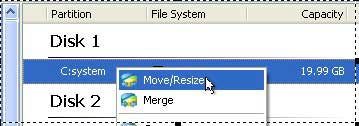
- Right click c and you will see some options, use your mouse to click "Resize/Move", which will
do the shrink job later. Option, you can also click c and the click the "Move/Resize" button
on the top menu or you may go to "Partition" and then you can also see the "Move/Resize".
- Shrink c when your mouse becomes a cross (a two directions symbol) in the "Move/Resize"
window.
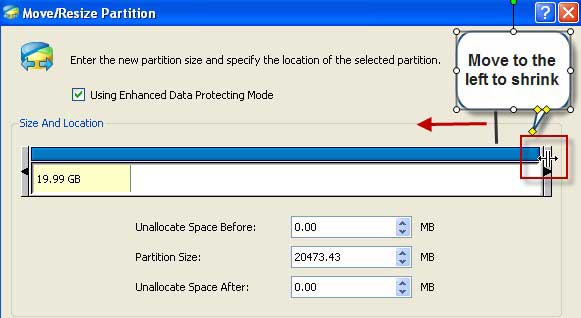
- When you move to left, you will see it is shrinking. You may stop at the right size you need and the
click "OK".
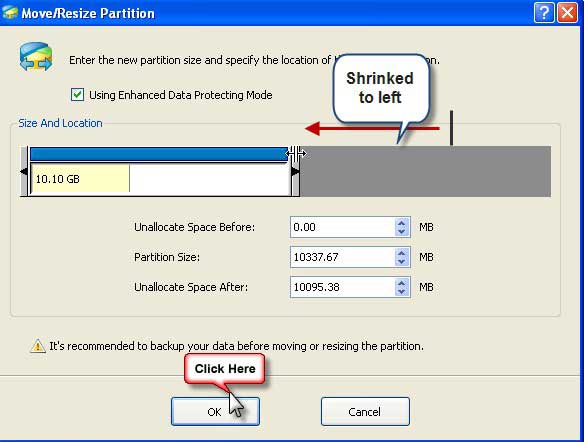
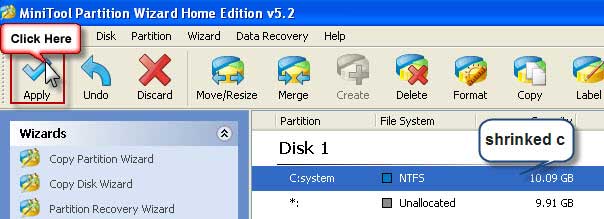
- To apply the shrinking, you need to click the "Apply" button on the top menu, which is located
in the very front of the top menu.
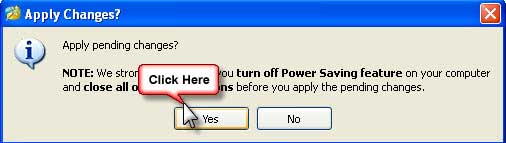
- The program will turn up some message to let you confirm that the shrinking will be processed in dos
module. It will shut down the computer to do the shrinking process. Click "Yes" to
confirm.
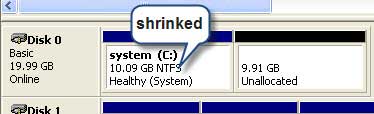
- In the test, the program reported the following options and we selected A) to restart our PC and let
Partition Wizard Home finish the shrinking.

- After around 1 minute, the shrinking was done and here is the current shrinked c in our disk management.
Partition Wizard Home Edition works all Microsoft Windows PC systems.
Download freeware Partition Wizard.
If you want to shrink or resize partition in Windows Server OS (server 2000, 2003, 2008), you need Partition Wizard Server instead of Partition Wizard Home.
Related products
- Partition Wizard Home Edition
- Acronis Disk Director Server
- Resize partition with partition magic
- Partition Manager Server
- Resize server Partition Wizard Server
Related articles
- Capture unallocated space Windows 7
- Extend C drive
- free partition magic
- merge partition extend c drive
- Resize vmware partition
- shrink c create partition
- Disk partitioning
- Server 2003 out of space
- windows 2003 low disk space
- server c drive out of space
- Add space to root partition 2003
- Resize partition RAID 5
- Resizing boot partition raid 5